One I recently got the chance to try out was Polly Plastics Moldable Plastic Pellets. Let me tell you, these are so much fun! I had a lot of fun trying them out and can't wait to make some more items using these pellets.
The pellets come in a 16 oz. jar. (You can also get them in 10 oz. and 35 oz. jars and a 2 lb. seal-able bag) The company did a very good job with the directions for use. It is easy to follow and the pellets are easy to have a blast with.
You simply need a bowl, hot water, the pellets, and wax or parchment paper. You heat the water up to about 140° 9I used my electric tea kettle) and either pour it over the pellets in a bowl or pour the pellets in after you add the hot water to the bowl. Here is where you need patience. It takes a few minutes, but the pellets start out white and then slowly turn clear. You need to wait for them to get completely clear before you start molding them. You can see in the pictures below how they start out, how they start to get clear and what they look like when they are all clear.
It is so neat to watch them change. When you first start to see the clear bits showing up it is tempting to want to start playing with it, but be patient. They need to be completely clear to really be able to mold them right.
Once they are all melted and clear, take them out of the water, shaking off any excess water. If you are doing this with kids, I would suggest that an adult take it out of the water to avoid any chance of burned fingers. You can use a spoon, but be aware that the melted pellets can stick to some things quickly! Work with the material on the wax or parchment paper to mold it into the shape you want. You can also use molds intended for shaping clays or even silicone molds.
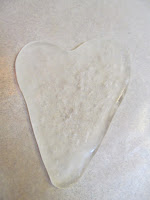
I chose to mold by hand and had fun with it. It was easy to manipulate the pellets into the shape I wanted and as I was working if it got too stiff, all I had to do was immerse it in the hot water for a few seconds to soften it up a little more. You can see, I made a folk art shaped heart and in the first image below it is still clear. You will be surprised how fast it dries to white though. It only takes a few minutes, and as it dries, it hardens into the solid shape you have made.
You can speed the process up a little by dipping the item in cold water, but be careful, while it is still not solid it can be bent and could possibly misshape your creation.
The neat thing is once it is dry you can paint, sand, drill and even super glue your creation. You can also add paint powder or alcohol inks to the melted pellets while you are shaping it to give it color. And when it is all dry, if you are not happy with the creation, just put it back in hot water to melt it down again. How cool is that?!
I really enjoy using the pellets! It was a lot of fun, super easy and my mind is racing now with some of the neat things I could make! I also think it is fairly reasonable in price for all you can get out of it.
You can purchase your own Polly Plastics Moldable Plastic Pellets HERE!
The reviewer has been compensated with receiving the product free in order to bring you an honest review. All opinions are those of the reviewer.


Creating an audiobook doesn’t have to be overwhelming. I found Publish My Audiobook to be the perfect solution — they took care of everything!
ReplyDeleteLoved this! For anyone looking for complete publishing support, I highly recommend Ladybird Publishers – from ghostwriting to illustrations, they do it all.
ReplyDelete